|
Ornamental and edible Gourds - Not your
everyday......Squash, Pumpkin or Gourd
Most of what we refer to as gourds are the
species Lagenaria siceraria.
Blooming vines of this species have white flowers. They are usually grown for
their ornamental value and not as food. Normally they are
inedible because of an offensive smell or bad taste. There are hard-shell gourds
such as the birdhouse and bottle gourds, and there are soft-shell gourds that
look similar to squash.
The words squash, pumpkin and gourd are
often used interchangeably, depending on the variety and local customs. The sole
exception is the decorative or jack-o’-lantern pumpkin, which is always
called a pumpkin and not a squash or a gourd.
Squash is edible, most gourds are not - they're dried and used for ornamental
purposes.
Gourds grow best in USDA Hardiness Zones
3-10. That makes just about anybody able to grow these for fall decor and garden
crafts, like birdhouses.
The best way to begin, is to sow seed, as
you would with pumpkins. When sowing these seeds is to plant them with the edge
facing down. Planted this way, water will run down the sides of the seeds,
thus reducing any risk of rotting.
L. siceraria, or the bottle gourd,
is thought to originate from southern Africa, and it seems from the DNA record
that two distinct subspecies were developed in Africa and Asia. It is thought to
have been cultivated as early as 13,000 BC.
American gourds are thought to have come
from the Asian subspecies, and it is likely that this was among the first
cultivated species in America.
Hard-shell gourds include the speckled swan,
bottle, dipper, penguin, and powderhorn varieties, of which the bottle gourd is
the most commonly cultivated. These produce beautiful white flowers on long
vines and either green or mottled fruits, which come in lots of shapes and
sizes.
These are the kind that are typically dried
after harvest, at which point they turn a soft tan color. They are edible when
immature.
Once dried, they can be kept indefinitely
and have been used for centuries for making musical instruments such as maracas,
to making lanterns, bottles, bowls, and birdhouses.
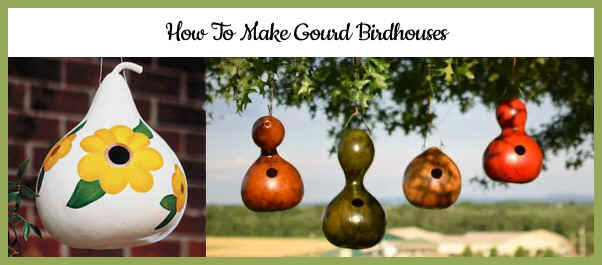
See the craft instructions for birdhouses
, Lanterns, and loofah
sponges
If you're making birdhouses, read
about how to keep bees and wasps out
How
To Prep and dry Gourds
Tasty
Winter Squash For Small Space and Urban Gardens
Best Ornamental Varieties of Gourds
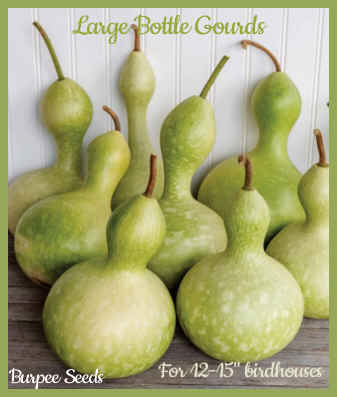
The ‘Birdhouse’ gourd (Bottle Gourds)
- These come in a variety of sizes.
I love to dry and paint these for birdhouses. I've had quite a few birds
living and breeding in them. They are very light when dried, so make sure you
tie the birdhouses securely so that they don't fly off fences or tree limbs and
damage your bird families. This is the most well-known variety available
for making birdhouses, martin houses, and for other uses in crafting. A must-have
on the list for anyone who gardens or is a bird-watcher. Allow the fruit to
mature as much as possible on the vine before harvesting and drying.
Suggestions for Ornamental
and Edible Varieties of Gourds and Winter Squash
If eating squash and gourds,
remember to eat them cooked, not raw.
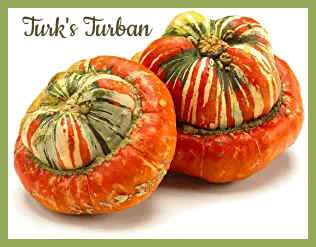 |
‘Turk’s Turban’ is
a classic gourd that’s popular during the fall for ornamental use,
but it is also edible.
Large, brighly colored variety has
flattened round fruit with purple, orange, white, and green
banding.
The fruit measures eight to ten
inches across and four to five inches in height. |
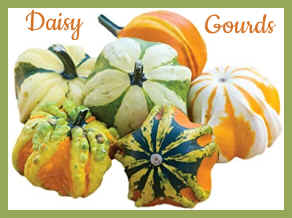 |
Daisy -
Ornamental
Cute little cultivars used in fall, harvest, and Thanksgiving displays.
Small and colorful gourds in
shades of orange, white, yellow, and green and produces loads of small
gourds measuring about two by three inches. Awesome on Autumn wreats and
in arrangements. |
|
|
|
|
|
|
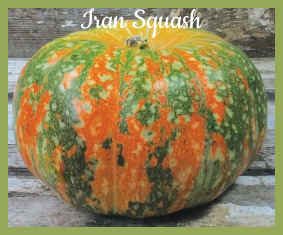
Iran
Squash - One
of the most unusual and beautiful squashes and tastes super sweet.
Collected in 1940 in northeastern Iran and preserved at the USDA
seed bank ever since.
This
squash is very ornamental. Fruit is medium to large in size (can weigh
15-20lbs). It keeps for a year or more, and is perfect for fall
decorating and eating. Prolific grower. Grows on or over anything, and
bears late season. |
|
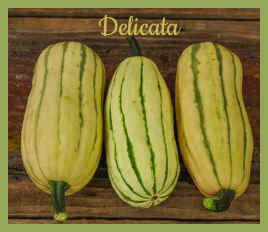
Delicata
- Delicious heirloom gourd, with a high
sugar content.
Fruit
is 1-3 lbs each. Delicate and sweet flavor. I enjoy their sweet taste
when roasted or cooked into quick breads and soups.
They
have a creamy texture when cooked, and are great for mashing.
|
|
|
|
|
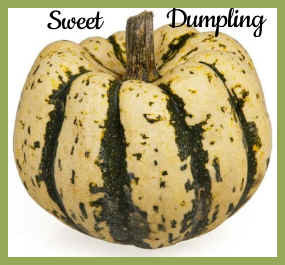 |
Sweet
Dumpling - The
Sweet Dumpling Squash is a small 3-4” pumpkin-shaped winter squash
with orange flesh. I like that these are shorter plants, about
18-24" tall.
They are
naturally very sweet and have a slight chestnut flavor. They can be
prepared in a variety of ways, including roasted, pan-fried, baked, or
even microwaved.
These
plants are very heavy producers, and the squash can be stored for up to
4 months after it is harvested. Bonus: The flowers also attract birds,
bees, and butterflies to your garden for pollination of your fruit,
vegetable and ornamental plants. |
 |
|
|
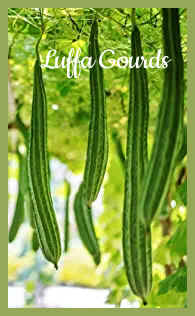
Luffa Gourds - Used to make
Loofah sponges.
It is also
a delicious gourd that can be steamed and pan-fried, and cooked like
okra.
|
 |
Bottle Gourd or
"Calabash" - The classic gourd for creating
birdhouses and ladles.
Ornamental and used in crafts, but
not considered a tasty edible. May cause upset stomach.
If eaten, it should be very young,
and cooked, not raw.
|
Gourds are very easy to grow by sowing seeds
directly in the garden. Gourds prefer full sun and rich well-drained soil that
is rich in organic material. Sow the seeds outdoors after all danger of frost
has passed and the weather is warm. Sow seeds 1-2 inches deep in groups of 4
seeds, spacing in groups 5 feet apart in rows spaced 8 feet apart. Thin
seedlings to 2 or 3 in each group when leaves develop. Gourds grow well on
trellises or supports, keeping the fruits off the ground.
I use green Velcro plant ties - reusable and
cut to any size you like. These are gentle on your plants, and sturdy enough for
heavier plants in your garden. I have honeysuckle, clematis and Giant Hibiscus
doing well with these ties. I also use the ties to attach light strings and
birdhouses to branches.
Squash plants need extra water during dry
and hot periods. They grow quickly and will train nicely on a trellis, fence or
other tall supports.
All plants in the curcubit family require
pollinators to be able to produce their fruit.
This means any pesticides should not be used,
to avoid interfering with or killing pollinators.
Start A Gourd Garden
The climbing vines look
beautiful when grown on trellises and along fences, over the tops of ornamental
plants in your garden. If you do decorate for fall, you're halfway there with
colorful plants when the fruit ripens. Some varieties are perfect for placing in
tubs and baskets in the yard and garden.
The main thing that is recommended in terms
of upkeep is to cut the vines back once they reach 10 feet in length. This
encourages the growth of side stems, where the female blossoms (which produce
fruit) will grow, ensuring a bumper crop. Gourds also produce male blossoms,
which grow on the main stem, but these do not produce fruit. Cutting back the
main stem discourages the growth of these male blossoms.
Conversely, if you are aiming to produce a
specific number of fruits per plant, or to encourage fewer more robust gourds to
grow, you can pinch or cut any remaining blooms and gourds from the vines once
you have reached your desired number. The best way to do this is by clipping
them near the vine and discarding them. This will force the plant to put all its
energy into the remaining vines and fruits. Just be sure to be very careful when
you do this, to avoid damaging the plant.
Harvest small gourds as they begin to
develop their full color and become hard to the touch. Many small gourds will
dry and preserve well. Harvest large gourds at frost time for decoration, they
will not keep for drying.
Sowing Directly in the Garden:
- Sow in a rich, well-drained location in
full sun after all danger of frost.
- Do not plant squash family crops in
the same spot 2 years in a row.
- Prepare the bed by turning the soil
under to a depth of 8 inches. Level with a rake to remove clumps of grass
and stones.
- Sow 6-8 seeds 3 inches apart in hills 8
feet apart.
- Cover seeds with a ½ inch of fine
soil.
- Firm lightly and keep evenly moist.
- Seeds emerge in 7-14 days.
- Thin seedlings to 3-4 per hill when
they are 1-2 inches high
- Attach vines to a trellis when tendrils
begin to grow and reach out. Tie again as the vines grow up the trellis.
Companion plants
Plants that work well together because they don’t battle each other for
nutrients in the soil and do well growing with gourds.
If starting indoors
Transplanting
Seedlings should be planted out when they
have developed four true leaves. To prepare them for the big move, be sure to
harden them off for one to two weeks before transplanting, providing gradual
exposure to gentle winds, sunlight, and colder temperatures outdoors.
Plant each seedling one to two inches
(2.5-5 centimeters) deep, so the bottom two leaves are sitting just above the
soil surface.
If you have chosen to trellis your plants,
they can be spaced 18-24 inches apart.
it’s best to secure each one to a bamboo
cane or some other form of support. This helps to prevent them developing
kinks in their stems, which can slow the plants’ growth – or worse, cause
them to collapse and die.
Be sure to give your plants a light
watering just after planting, and then once every two to three days for the
first week.
How to Grow
Gourds are sun-loving vegetables, and they
thrive in sunny spots with good drainage. it’s a good idea to add a generous
amount of compost or aged manure when planting.
- Keep weeds under control during the
growing season. Weeds compete with plants for water, space and nutrients,
so control them by either cultivating often or use a mulch to prevent
their seeds from germinating. Avoid disturbing the soil around the plants
when weeding.
- Keep plants well watered during dry
periods to promote rapid, uninterrupted growth. Plants need about 1 inch
of rain per week during the growing season. Use a rain gauge to check to
see if you need to add water. It’s best to water with a drip or trickle
system that delivers water at low pressure at the soil level. If you water
with overhead sprinklers, water early in the day so the foliage has time
to dry off before evening, to minimize disease problems. Keep the soil
damp, but not saturated.
- Gourds grow well on trellises or
supports, keeping the fruits off the ground.
- Monitor for pests and diseases. Check
with your local Cooperative Extension Service for pest controls
recommended for your area.
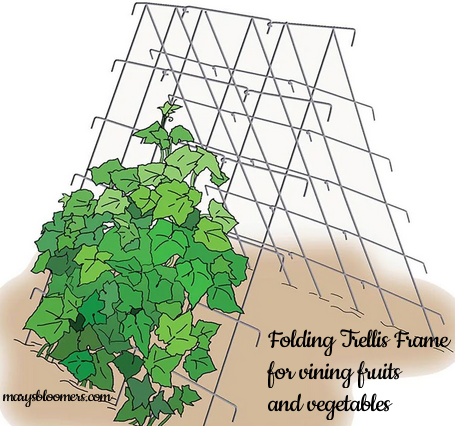 |
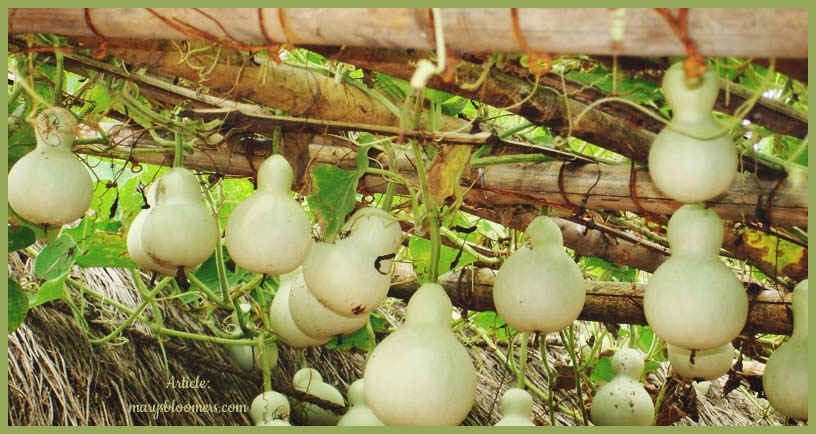
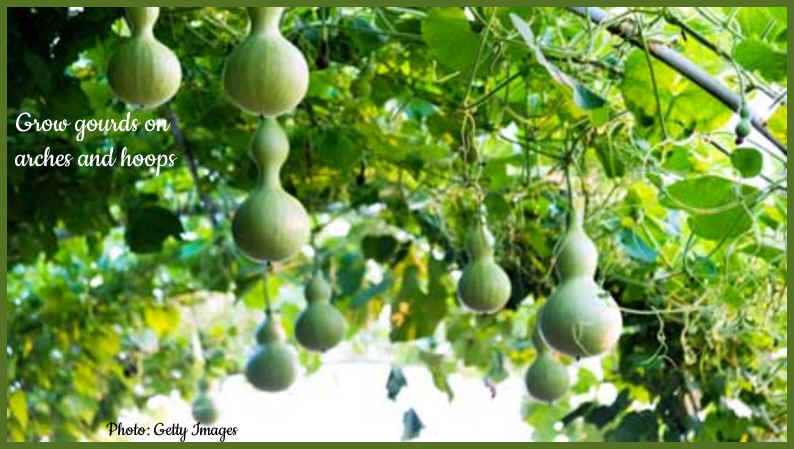
An easy and space-saving way to grow
gourds is to trellis them, training their stems to grow up wires or over a
framework. This is great for space saving, protecting your gourds from insects
and rot, and keeping them clean. The frame pictured folds for storage
Any type of vining
squash, gourd or other climbing vegetables can be grown vertically. Growing on a trellis or other
vertical structure helps to keep the aggressive gourd vines from taking over your
vegetable beds. Trellising also ensures that your gourds will grow into
an even shape, rather than becoming flat on one side, as they do if they are grown on the ground.
Gourds are natural climbers, and they
don’t require any training. The main consideration for trellising that you
will need to keep in mind is weight.
|
|
For heavier varieties that grow to a large size at maturity, two sturdy posts
with an upper and lower wire and garden twine woven between will be enough
to support them.
For smaller types, a tall
(approx. 4 1/2 ft.) wire cage, like a larger and heavier version of
a tomato cage, will work. I prefer the square rather than the round
cages because you can line them up closer, place along a fence, or
squeeze into a corner without wasting space. I like the straight lines
and holes wide enough to allow you to reach inside and pick without
rocking the support.
I like to turn the cages upside
down and insert landscape pins or anchors to hold it down. My vining
plants will have more room where i planted them, because that end is
wider, and they will climb up over the pokey things on top. I bend the
pieces in at the top to make it look conical when covered with vines.
You could also choose to place them near a sturdy
structure that they can climb, such as a pergola, arbor or fence. Fence panels
and sections of lattice work very well, and are ornamental, as well.
Squash and vining vegetables can
be grown in hanging baskets, as well. |
It’s nearly impossible to leave a gourd
on the vine too long, but removing them too early will often cause them to
shrivel and rot.
Leave them on the vine until the stems and
tendrils begin to turn brown. This will typically be around 100-180 days after
planting.
A good indication that they are ready for
picking is that your gourds will feel light, which means the water inside is
evaporating and the pulp is drying out.
Picking A Full-Size Harvest of Winter Squash
Bush winter squash should be harvested before the first frost, because
squash subjected to frost don’t keep as well. To determine whether a winter
squash is ready to harvest, poke the skin with your fingernail. If your nail
leaves a mark, the squash is still immature. Don't rush to pick a squash.
Even if it looks ripe and passes the fingernail hardness test, wait a week
or two before harvesting it. Squash allowed to mature fully on the vine keep
longer in storage.
After being picked, winter squash improves in flavor if allowed to cure for
a week or two. Harvested fruits should be kept outside in a warm and sunny
place for a few days, then stored in a dry indoor environment with a
temperature of around 55˚F. The fruit from most compact winter squash
plants keeps for three to nine months—butternuts the longest, acorns the
shortest.
Tasty
Winter Squash For Small Space and Urban Gardens
Varieties Suggested by Fine Gardening
Magazine, Baker Creek Heirloom Seeds, and Burpee
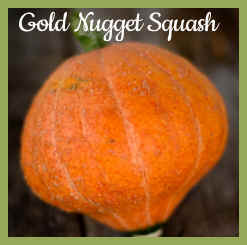
| ‘Gold Nugget’,
a bush buttercup has a strong squash taste. The fruits, which average
1 lb. to 3 lb., start out pale yellow and ripen to red-orange with
faint striping. The flesh inside is firm, dry, and dark yellow. The
fruits’ tough skin repels squash bugs and cucumber beetles, but the
stems, like those of other buttercup squash, are highly susceptible to
vine borers.
‘Emerald Bush Buttercup’ is
often billed as a true bush variety, but sometimes the plants start
out as a tidy bush, then send out runners toward the end of the
season. The fruits are pale gray-green, similar to those of most
vining buttercups. To prevent sun-scald and insect damage, harvest the
fruits as soon as they mature.
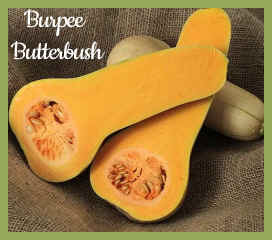
‘Burpee’s Butterbush’ is the
best of the bush butternuts. It produces small, uniform fruits that
usually weigh less than 1-1/2 lb. each. Like all butternuts, is highly
resistant to vine borers because vine borer larvae have trouble
chewing their way into the hard stems. But you must be sure to thin
some of the fruits; otherwise the plants will overproduce, leaving you
with teeny squash.
‘Ponca’ Mini Butternut -
True to the butternut type, ‘Ponca’ fruits have
tan skin, thick necks, and lots of light orange flesh.
‘Table King’ is a bush acorn
variety whose compact plants are vigorous. The fruits mature in only
75 days, but taste much better if allowed to cure on the vine a few
more weeks, until their bottoms turn orange. Thin to five fruits per
plant, and they will develop into full-size, full-flavored squash.
‘Sweet Dumpling’. This
variety is a relative of acorn squash has a compact vine most of the
season. It develops a larger vine toward harvest time. The green and
white striped fruits are perfect for a single serving. Their flavor
is richer, sweeter, and nuttier than that of other acorn varieties.
|
How
To Prep Gourds
Storage
If you are planning to use your gourds as
instruments or for other crafts, you can tell if they are fully dry and good
to go when you can hear the dry seeds rattling around inside
- Harvest after the shells harden. Cut
the fruits from the vines with 1-2 inches of stem attached.
- Cure them for a week in a warm, dry
location with good air circulation.
- Store them in a cool, dry place at
50-55 degrees F for use throughout the winter.
For proper storage, pick a well ventilated, dry area with temperatures
between 55-65°F. You’ll need to leave the gourds to dry for 1-6 months.
It’s necessary to dry them fully if you plan to use gourds for crafts or
other projects. Put the gourd in an area that gets plenty of airflow in
all directions. You can hang the gourd or place it on a surface, such as a
drying rack or pallet. If drying multiple gourds, make sure the gourds do
not touch.
- Add to fall and winter displays or
paint them when dried.
- To clean dried gourds - Put it in a
solution of 1 part bleach to 10 parts water. This kills the mold that has
formed on the gourd while drying.
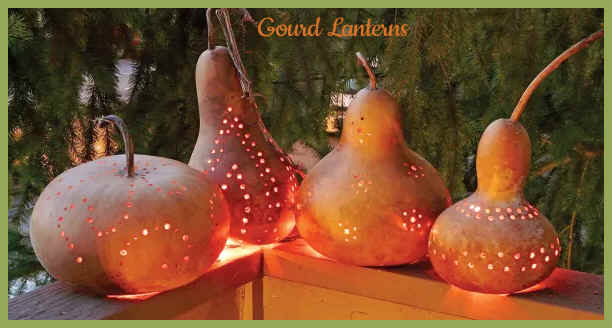
How
to make a gourd lantern for railings and tables
- Soak the the dried gourd in a bucket of water for about 10 minutes. The
gourd will float, so turn it occasionally to keep all sides wet.
- Use a scrubbing sponge to remove the grime. It should rub off with
medium pressure. If you find an area that’s difficult to scrub clean, let it soak a bit longer.
- Allow the gourd to air-dry.
- The gourd will have some natural discoloration even after cleaning.
- cut off the base of the gourd, clear the inside, and drill
holes in a pattern.
Mineral oil rubbed on the exterior gives it a subtle shine
- Insert battery-powered tea or string lights complete the
effect. I use solar lights for all of my outdoor lighting, crafts and decor.
Making
Loofah Sponges
Allow these to mature until the stem turns yellow and the skin begins to dry and
fade.
The fruit should be 16-24 inches long. Cut the gourds off the vine with scissors
or a sharp knife and allow them to dry in the sun for about two weeks. They are
ready when the skin hardens and turns brown.
Cut open the larger end of the fruit and shake out the seeds. Soak for a day or
two in water.
Peel off the outer skin. The sponges may be dingy yellow in color. If you wish
to lighten the color, bleach the sponges in a 10% solution for an hour or
so.
The softness of the sponge will be determined by the color of the skin of the
fruit when it is harvested. Greener fruit produce softer sponges, yellower fruit
produces tougher sponges.
|
You can use any bottle or wide-bottomed gourds
|
- Dried birdhouse gourd
- Wooden dowel
- Pumpkin carving tool
- sandpaper
- Drill
- Paint pen to create or outline a design,
if desired
- Outdoor Spray Varnish - I make sure to
use weatherproof and non-toxic (food grade) varnishes and paint sprays in my
garden crafts to keep the wildlife safe.
- Twine or galvanized wire
- Use a pumpkin carving tool and cut a circle
into belly of gourd. (See note below on suggested hole
sizes) Sand cut
edges. Clean out as much of the dried flesh and
seeds inside gourd as possible.
- Lightly sand outside of gourd. Wipe off dust with rag.
- Drill horizontally through top of gourd,
using a bit the same size as the wooden dowel. Trim down dowel to fit through
top of gourd with 2 in. on each side outside the gourd. If using a birdhouse
with an eye screw on top, skip this step. Drill a small hole in the bottom
of the gourd to allow for drainage.
- Draw design onto gourd with pencil, and
trace with paint pen, or paint a design with outdoor/weatherproof paints.
- Spray gourd with varnish to seal. Tie
twine around each dowel side, making a loop to hang. If using an eye
hook and wire, drill a hole in the top a little smaller than the hook. Screw
the hook in, and use the wire to make a hanging loop.
Note: Experience showed me that the twine will eventually rot in wet
weather, and will break, possibly harming a bird family. I use thin
galvanized wire instead. I attach "eye" hook screws to the tops
of the gourds for hangers.
NOTE:
Each bird species has its own requirements for habitat, entrance-hole size and
cavity dimensions. For instance, house wrens need a 1-in. entrance hole in
a 5- to 6-in. diameter gourd and prefer them hung in a shady area close to
brush. Purple martins like doorways that measure 2 1/8 in. and the gourds to be
hung high in open areas. Chickadees need a 1 1/8-in. hole and like to nest in
wooded areas. Bluebirds and tree swallows require a 1½-in. hole and prefer to
nest in open areas. For flycatchers, make the hole 1¾ to 2 in. in diameter and
hang the gourd in a tree close to a brushy area.
How
to keep wasps and bees out of birdhouses
You can prevent wasps and bees from establishing themselves by
applying a thin layer of soap (use bar soap) onto the inside surface of the
birdhouse roof. This will create a slippery surface between the insects and the
roof of the box, and they cannot build a nest.
For homemade and gourd bird homes, best thing is to keep them
out of areas that are filled with flowers, where bees and other pollinators
frequent.
For gourd birdhouses, you probably won't be able to reach to coat the roof. The
bees and wasps will probably be an on-going issue in some areas with
wildflowers.
Spray cooking oil inside the house will help, but don't spray the entrance
hole - oil will damage the birds' feathers. A spray of diluted coconut and
dishwashing soap near the top, inside the gourd, might work.
sources
Product Photos and Growing Information:
Burpee Seed
Fine Gardening Magazine
USDA


Birds and Blooms
Gourd Lanterns
Photo and instructions:
Bob Vila
Uncredited photos:
Pinterest, public domain photos
Design, graphics,
and articles ©2020 marysbloomers.com™
All rights reserved.
|