 |
Free .pdf Downloads - Vintage Gardening, Preserving, and Recipe Publications-->
|
Dehydrators A food dehydrator is a
small electrical appliance for drying foods indoors. It has an electric
element for heat, and a fan and vents for air circulation.
Dehydrators are efficiently designed to dry foods fast at 140ºF. Dehydrator Features to Look For
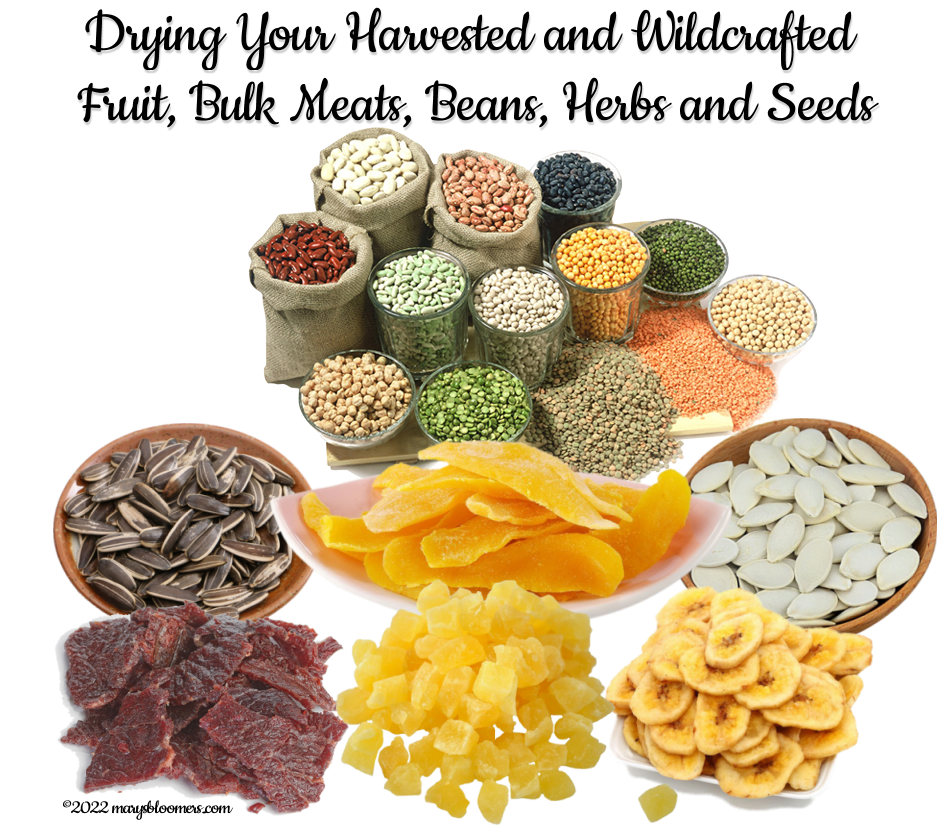
There are two basic designs for dehydrators. One has horizontal air flow and the other has vertical air flow. In the units with horizontal flow, the heating element and fan are located on the side of the unit. The major advantages of horizontal flow are: it reduces flavor mixture so several different foods can be dried at one time; all trays receive equal heat penetration; and juices or liquids do not drip down into the heating element. Vertical air flow dehydrators have the heating element and fan located at the base. If different foods are dried, flavors can mix and liquids can drip into the heating element. Fruit LeathersFruit leathers are homemade fruit rolls. They are a tasty chewy, dried fruit product. Fruit leathers are made by pouring pureéd fruit onto a flat surface for drying. When dried, the fruit is pulled from the surface and rolled. It gets the name "leather" from the fact that when pureéd fruit is dried, it is shiny and has the texture of leather. The advantages of making your own fruit leathers are to save money use less sugar and to mix fruit flavors. Leftover fruit pulp from making jelly can be blended and made into fruit rolls. Directions follow for making fruit leathers. Fresh, frozen or drained canned fruit can be used. Leathers From Fresh Fruit Approximate drying times are 6 to 8 hours in a dehydrator, up to 18 hours in an oven, and 1 to 2 days in the sun.
Home preserved or store-bought
canned or frozen fruit can be used. Purée fruit until smooth. If thick,
add liquid.
Preparing the TraysFor drying in the oven a 13" X 15" cookie pan with edges works well. Line pan with plastic wrap being careful to smooth out wrinkles. Do not use waxed paper or aluminum foil. To dry in a dehydrator, specially-designed plastic sheets can be purchased or plastic trays can be lined with plastic wrap. Pouring the LeatherFruit leathers can be poured into a single large sheet (13" X 15") or into several smaller sizes. Spread pureé evenly, about 1/8-inch thick, onto drying tray. Avoid pouring pureé too close to the edge of the cookie sheet. The larger fruit leathers take longer to dry. Approximate drying times are 6 to 8 hours in a dehydrator, up to 18 hours in an oven and 1 to 2 days in the sun. Drying the LeatherDry fruit leathers at 140ºF. Chances are the fruit leather will not last long enough for storage. If it does, it will keep up to 1 month at room temperature. For storage up to 1 year, place tightly wrapped rolls in the freezer. Spices, Flavors and GarnishesTo add interest to your fruit leathers, spices, flavorings or garnishes can be added. Spices to Try — Allspice, cinnamon, cloves, coriander, ginger, mace, mint, nutmeg or pumpkin pie spice. Use sparingly, start with 1/8 teaspoon for each 2 cups of pureé. Flavorings to Try — Almond extract, lemon juice, lemon peel, lime juice, lime peel, orange extract, orange juice, orange peel or vanilla extract. Use sparingly, try 1/8 to 1/4 teaspoon for each 2 cups of pureé. Delicious Additions to Try — Shredded coconut, chopped dates, other dried chopped fruits, granola, miniature marshmallows, chopped nuts, chopped raisins, poppy seeds, sesame seeds or sunflower seeds. Fillings to Try — Melted chocolate, softened cream cheese, cheese spreads, jam, preserves, marmalade, marshmallow cream or peanut butter. Spread one or more of these on the leather after it is dried and then roll. Store in refrigerator. Drying Herbs Drying is the easiest method of preserving herbs. Simply expose the leaves, flowers or seeds to warm, dry air. Leave the herbs in a well ventilated area until the moisture evaporates. Sun drying is not recommended because the herbs can lose flavor and color. The best time to harvest most herbs for drying is just before the flowers first open when they are in the bursting bud stage. Gather the herbs in the early morning after the dew has evaporated to minimize wilting. Avoid bruising the leaves. They should not lie in the sun or unattended after harvesting. Rinse herbs in cool water and gently shake to remove excess moisture. Discard all bruised, soiled or imperfect leaves and stems. Dehydrator drying is a fast and easy way to dry high quality herbs because temperature and air circulation can be controlled. Pre-heat dehydrator with the thermostat set to 95°F to 115°F. In areas with higher humidity, temperatures as high as 125°F may be needed. After rinsing under cool, running water and shaking to remove excess moisture, place the herbs in a single layer on dehydrator trays. Drying times may vary from 1 to 4 hours. Check periodically. Herbs are dry when they crumble, and stems break when bent. Check your dehydrator instruction booklet for specific details. Less Tender Herbs — The more sturdy herbs such as rosemary, sage, thyme, summer savory and parsley are the easiest to dry without a dehydrator. Tie them into small bundles and hang them to air dry. Air drying outdoors is often possible; however, better color and flavor retention usually results from drying indoors. Tender-Leaf Herbs — Basil, oregano, tarragon, lemon balm and the mints have a high moisture content and will mold if not dried quickly. Try hanging the tender-leaf herbs or those with seeds inside paper bags to dry. Tear or punch holes in the sides of the bag. Suspend a small bunch (large amounts will mold) of herbs in a bag and close the top with a rubber band. Place where air currents will circulate through the bag. Any leaves and seeds that fall off will be caught in the bottom of the bag. Another method, especially nice
for mint, sage or bay leaf, is to dry the leaves separately. Microwave ovens are a fast way to dry herbs when only small quantities are to be prepared. Follow the directions that come with your microwave oven. When the leaves are crispy dry and crumple easily between the fingers, they are ready to be packaged and stored. Dried leaves may be left whole and crumpled as used, or coarsely crumpled before storage. Husks can be removed from seeds by rubbing the seeds between the hands and blowing away the chaff. Place herbs in airtight containers and store in a cool, dry, dark area to protect color and fragrance. Dried herbs are usually 3 to 4 times stronger than the fresh herbs. To substitute dried herbs in a recipe that calls for fresh herbs, use 1/4 to 1/3 of the amount listed in the recipe. Jerky - Drying MeatsJerky is a lightweight, dried meat product that is a handy food for backpackers, campers and outdoor sports enthusiasts. It requires no refrigeration. Jerky can be made from almost any lean meat, including beef, pork, venison or smoked turkey breast. Raw poultry is generally not recommended for use in making jerky because of the texture and flavor of the finished product. Raw meats can be contaminated with
microorganisms that cause disease. These harmful bacteria can easily
multiply on moist, high protein foods like meat and poultry and can
cause illness if the products are not handled correctly. Follow these recommendations for safe handling of meat and poultry: When preparing jerky from wild game, it is important to remember that the wound location and skill of the hunter can affect the safety of the meat. If the animal is wounded in such a way that the contents of its gut come in contact with the meat or the hunter’s hands while dressing the meat, fecal bacteria can contaminate the meat. It is best to avoid making jerky from this meat and use it only in ways that it will be thoroughly cooked. Deer carcasses should be rapidly chilled to avoid bacterial growth. The risk of foodborne illness from home-dried jerky can be decreased by allowing the internal temperature of the meat to reach 160ºF, but in such a way as to prevent case hardening. Two methods can be used: heating meat strips in marinade before drying or heating the dried jerky strips in an oven after the drying process is completed. Directions for both methods are below. When the strips are heated in a marinade before drying, drying times will be reduced. Color and texture will differ from traditional jerky. Preparing the MeatPartially freeze meat to make
slicing easier. The thickness of the meat strips will make a
difference in the safety of the methods recommended in this book.
Slice meat no thicker than ¼ inch. Jerky MarinadeCombine all ingredients. Place
strips of meat in a shallow pan and cover with marinade. Cover and
refrigerate 1-2 hours or overnight. Products marinated for several
hours may be more salty than some people prefer. If you choose to heat
the meat prior to drying to decrease the risk of foodborne illness, do
so at the end of the marination time. Drying the MeatRemove meat strips from the marinade and drain on clean, absorbent towels. Arrange strips on dehydrator trays or cake racks placed on baking sheets for oven drying. Place the slices close together, but not touching or overlapping. Place the racks in a dehydrator or oven preheated to 140ºF. Dry until a test piece cracks but does not break when it is bent (10 to 24 hours for samples not heated in marinade). Samples heated in marinade will dry faster. Begin checking samples after 3 hours. Once drying is completed, pat off any beads of oil with clean, absorbent towels and cool. Remove strips from the racks. Cool. Package in glass jars or heavy plastic food storage bags. Vacuum packaging is also a good option. If the strips were not heated in
marinade prior to drying, they can be heated in an oven after drying
as an added safety measure. Making Jerky from Ground MeatJerky can be made from ground meat using special presses to form or shape the product. Disease-causing microorganisms are more difficult to eliminate in ground meat than in whole meat strips. (If ground meat is used, follow the general tips for safe handling of meat and poultry, above.) Be sure to follow the dehydrator manufacturer’s directions when heating the product at the end of drying time. Again, an internal temperature of 160ºF is necessary to eliminate disease-causing bacteria such as E. coli O157:H7, if present. Storing the JerkyProperly dried jerky will keep at room temperature two weeks in a sealed container. For best results, to increase shelf life and maintain best flavor and quality, refrigerate or freeze jerky. Pumpkin SeedsDrying seeds and roasting seeds
are two different processes. To follow up with roasting, take dried pumpkin seeds, toss with oil and/or salt and roast in a preheated oven at 250ºF for 10 to 15 minutes. Sunflower SeedsSunflower seeds usually are left on the flower to dry. The flower may have to be wrapped with cheesecloth to prevent the birds from eating the seeds. Seeds may be dried in the sun or in a dehydrator at 100ºF. Higher temperature affects the flavor. When seeds are dried, they can be roasted in a shallow pan at 300ºF for 10 to 15 minutes. Vegetable LeathersVegetable leathers are made similar to fruit leathers. Common vegetable leathers are pumpkin, mixed vegetable and tomato. Purée cooked vegetables and strain. Spices can be added for flavoring. Mixed Vegetable LeatherPumpkin LeatherBlend ingredients well. Spread on tray or cookie sheet lined with plastic wrap. Dry at 140ºF. Tomato LeatherCore ripe tomatoes and cut into quarters. Cook over low heat in a covered saucepan, 15 to 20 minutes. Purée or force through a sieve or colander and pour into electric fry pan or shallow pan. Add salt to taste and cook over low heat until thickened. Spread on a cookie sheet or tray lined with plastic wrap. Dry at 140ºF. Vine Drying OutdoorsOne method of drying out-of-doors
is vine drying. Pasteurization of Vine-Dried BeansLike sun dried fruits, vine dried beans need a treatment to be assured there are no insects in your dried harvest.
More recipes for preserving homegrown and foraged foods---> Canning your fruit harvests--> Pickling---> Article Sources "So Easy to Preserve",
6th ed. 2014. Bulletin 989, Cooperative Extension Service, The
University of Georgia
Design, graphics,
articles and
photos ©2022 marysbloomers.com™ |